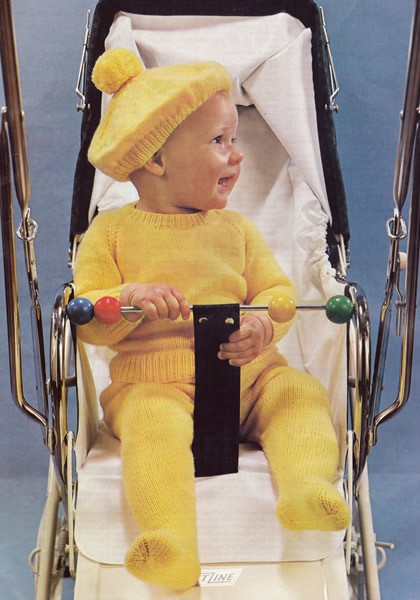
Home

Weblog

Knitalong

Pattern of
the Month

On the Needles
(...and Off the Needles)

Stitchcraft

Vintage
Patterns

About the
Idle Hands


January 2012

Isobel's Little Blanket

IsobelsBlanket.jpg

This is small blanket or cot cover made from 12 crochet squares in chunky yarn (so quick to make). It's based the usual granny-square principle, but a very pretty example of it incorporating the central flower motif.

Instructions

There are a couple of new stitches used in this pattern, as well as basic chain, dc, and treble. There is a "cluster" used in making the central flower, and crab stitch for the edging.

Make cluster:

Working all into the same stitch, **yoh, draw through loop **; repeat from ** to ** 4 times (9 loops on hook); yoh, draw loop through all loops on hook; yoh, draw loop through stitch on hook.
[Editor's note: This last stitch is just "1 chain".]

Crab Stitch

Crab stitch is worked exactly as you do double crochet - but from right to left instead of left to right. It seems very awkward but just force yourself to do it; push the hook through the stitch to the right of your needle, pull through a loop, then yoh and pull through both loops on hook.

It creates a very attractive twisted ribbed edge.

There a is you tube extract inserted at end of this item - or go search the web for "crab stitch" for a variety of explanations.

Motif (make 12)

Starting at the centre of the square: using 7mm hook and first contrast, (plum), make 6ch and join in a ring using a slip stitch.

1st round: 8dc into the ring and join with a slip stitch to top of first dc.
2nd round: **1 cluster in first dc, 3ch; 1 cluster in next dc, 1ch **; repeat from ** to ** 3 times more, and join with a slip stitch to top of first st.
Change to second contrast (cream).
3rd round: Insert hook in first 3-chain space and make 2 chain for first treble; **2tr in same space, 3ch; 3tr in same space, 1ch; 3tr in next 1-chain space, 1ch; 1tr in next 3-chain space, ** repeat from ** to ** 3 times more, omitting the very last tr in the repeated sequence, and join with a slip stitch to top of first chains.
Change to third contrast (lime).
4th round: 1 dc **1dc over each of next 3tr, 3dc into next 3-chain space; 1dc over each of next 3tr, 1dc into next 1-chain space; 1dc over each of next 3tr, 1dc into next 1-chain space;**. Repeat from ** to ** 3 times more, and join with a slip stitch to top of first dc.

Fasten off.

This completes the motif.

IsobelsBlanket_detail.jpg

To Make Up

Make 12 squares altogether.

With 7mm hook and 3rd contrast (lime), join 2 squares together; hold right sides together and slip stitch through the back loop of each dc, leaving the front loops exposed as a decorative ridge on the right side (see photos).
[Editor's note: If you can't immediately see what is meant here, try experimenting. There is a loop on each side of a crochet stitch; usually when placing a stitch on top on the next row, you push your hook through both loops, but for some decorative sts, you are asked to use either only the back or only the front loops in order to create a ridge, Whatever you end up doing, just make sure you are consistent, so that you get a nice consistent pattern emerging.]

Join 3 squares in a row, then join the 4 rows together.

Finally, using first contrast (plum) and right side facing, work a row of dc all around the blanket, and work 2 or 3sts into the 4 corner sts, to make it curve properly. Then, keeping the right side facing you, change to a 6mm hook and go back the way you came, working one row of crab stitch right to left.

Sew in all ends.

Block the blanket by pinning it out and dampening; leave to dry. You can press very lightly with a damp cloth - just hold the iron above the cloth so it heats it but do not press down. You want to leave the texture of the stitches in place, so do not press heavily.

Crab Stitch

Here is a You Tube item showing how to do crab stitch - a picture painting a thousand words and so on.

Materials

2 x 50g balls of chunky in each of first and second contrast and 1 ball in third contrast.


One No 2 (7mm) and one No 4 (6mm) crochet hook.

Tension

Each square is intended to measure 4¾ inches.

Size matters

To fit cot, pram, or Moses basket.

Abbreviations

yoh: yarn over hook.
ch: chain.
cl: cluster.
dc: double crochet.
tr: treble crochet.
[Editor's note: Remember this is English crochet where dc is equivalent to US single crochet, and tr is equivalent to US double crochet - see "Terminology" in the side bar.]

A word on the wool.

The original yarn produces a tension of 13sts x 19 rows to 4 ins over stocking stitch. You can substitute an Aran weight yarn worked double throughout, though this is less easy to work with for crochet patterns.

I used Patons Pompero a chunky yarn, knitting to a tension of 16sts x 22 rows to 4 ins, which is thinner, though I used a 7mm hook with it.

Result of my yarn choice is a smaller blanket, requiring only one ball in each colour.

Disclaimer
(well...almost)

In transposing any pattern it is always a risk that errors will be introduced, in spite of dedicated proof reading.
If you have any problems with this pattern, please and I will try and assist.

December 2011

Sideways Stash Socks

HoneycombBedsocks.jpg

Father George - so fond of his bedsocks they get worn out. So by request - here are some more.
[Since he is not bedridden I can only surmise he does not restrict their use to the bedroom!]

The patterned section of the sock is knitted sideways using a variation of a honeycomb stitch; it's an opportunity to use up really small amounts of double knitting yarn. I rotated 4 contrast colours but you could use a different colour for every set of rows; the key is to keep some consistency in the main colour.

Instructions.

The first section of these socks is knitted sideways making a "T" shape where the upright of the "T" is the upper foot, and the cross bar curls around the leg to form the cuff, meeting at the back seam.
The second section knits the heel and then sole of the sock, and then the toe, picking up stitches from the first section
Finally you pick up stitches at the top of the sock and knit the welt.

First section (knit 2)

Starting at the back leg seam, with main shade (M) cast on 23 sts on 2 needles and knit one row. Commence pattern.

Join in contrasts (C1, C2 etc):
1st row: Using C1, p3 * sl1, p3; repeat from * to end of row
2nd row: Using C1, k3 * sl1, k3; repeat from * to end of row
3rd row: As first row.
4th row: As second row.
5th row: Using main shade (M) purl across all sts.
6th row: Using C2, k1, sl1, * k3, sl1; repeat from * to last st, k1.
7th row: Using C2, p1, sl1, * p3, sl1; repeat from * to last st, p1.
8th row: As 6th row.
9th row: As 7th row.
10th row: Using main shade (M) knit across all sts.

Repeat rows 1-10 using different contrasts, once more.

Next row(wrong side facing): Cast on 40 sts, and then work across them and all sts, as for 1st row of pattern. [63sts]
[Editor's note: If you want a shorter or longer foot length cast on more or fewer stitches here. Reduce or add sts in multiples of 4, which is about ¾ of an inch]

Continue to work the pattern on these 63 sts, working rows 1-10 three times, and then rows 1-4.

Next row(wrong side facing): Using main shade, cast off 40 sts, and purl across remainder. [23sts]

Continue to work the pattern on these 23 sts, working rows 6-10, then rows 1-10 once, times, and then rows 1-4.
Cast off purlwise using main shade (centre back seam).

Second section (heel and sole).

The remainder of the socks are worked entirely in the main shade.

For the heel: with right side of the first section facing, oriented like an upside down "T" pick up 11 sts from each side of the instep:

Pick up and knit 11 sts from the left side first, ending at the cast on edge (which will be the centre back, and then turn the work over and bend round the second side, and pick up 11sts from the right side. The sock cuff now forms a circle with the back seams together, but not yet sewn.

Turn and purl 1 row across these 22 sts.

Next row(right side facing): * Sl1, k1, repeat from * to end.
Next row: Purl

Repeat the last 2 rows 10 times more.

Turn the heel:

Next row: Sl1, k12, k2tog, k1. Turn.
Next row: Sl1, p5, p2tog, p1. Turn.
Next row: Sl1, k6, k2tog, k1. Turn.
Next row: Sl1, p7, p2tog, p1. Turn.

Continue to work short rows and decrease in this way until all sts have been incorporated. [14sts].

Next row(right side facing): Sl1, k13, pick up and knit 13 sts down side of heel. Turn.
Next row: P27, pick up and purl 13 sts down other side of heel. Turn.

Now work the instep decreases and sole:

Next row: K1, sl1, k1, psso; knit to last 3 sts, k2tog k1. Turn.
Next row: Purl.

Repeat the last 2 rows until 22 sts remain.
[Editor's note: if you want to make the sock for a narrower foot circumference then decrease a few more sts here. About 6 sts for an inch.]

Continue to work a further 50 rows to make the sole - upper and lower foot sections should be about the same length.
[Editor's note: if you altered the sock length by casting on more of fewer than 40 sts, then adjust the number of rows you knit here. For every 4 sts different in the first section, allow 5 rows difference in the sole.]

Toe

Now we move to working in the round.

Knit 11 sts on first double-pointed needle, 11sts on second, then with right side facing, using third needle, pick up and knit 24 sts across the toe edge of the first section.
Complete the round, knitting 11 sts from first needle then 11 sts from second. Knit one more round.

Next round: K1, sl1, k1, psso; knit to last 3 sts on third needle, k2tog k1. Complete the round by knitting the 11 sts on each of the first and second needles. [44 sts]

Next round: K1, sl1, k1, psso; knit to last 3 sts on third needle, k2tog k1; on first needle, k1, sl1, k1 psso; knit to end; on second needle, knit to last 3 sts, k2tog k1.
Next round: Knit.

Repeat the last 2 rounds until 16sts remain.
Slip the sts from the second needle on to the first and graft the sts together with those on the third needle.

Making up

Sew seams on each side of the sole, using a flat seam technique (not mattress stitch for example).

Using double pointed needles and main shade, pick up 60-66 sts round top of sock and knit a k3/p3 rib for about 8 rows (or as long as you want), to form the welt. Cast off loosely.

Sew in all ends.

Materials

2 x 50g balls of double knitting yarn, and a variety of left over DK colours.

One pair and one of four No 8 (4mm) needles, pointed at both ends.

Tension

22 stitches = 4ins

Size matters

Length of foot, 9 inches (adjustable).

Abbreviations

M is main shade (olive).
C are contrasts.

sl1: slip the next stitch

k2tog or p2tog: work 2 sts together to decrease.

psso: pass the slipped stitch over, (also known as "ssk"; effectively you are "knitting 2 together through back loops")

A Word
on the Wool.

I used Phildar Oxygene in olive for the main colour, and a 4 other colours for the contrast - you could have every colour change (15 colours) different if you wanted.

Disclaimer
(well...almost)

In transposing any pattern it is always a risk that errors will be introduced, in spite of dedicated proof reading.
If you have any problems with this pattern, please and I will try and assist.

November 2011

Fifties Fair-Isle

SkiSlopeFairIsle.jpg

The third (and final) fair-isle design for November is a 1950s or early 60s cardigan in a double knitting weight yarn. No clues as to the original colour scheme here, and although for today it would seem appropriate to go with the grey palette, I am sure the original would have been more colourful.

Instructions

The Back and Fronts are worked in one piece up to the armhole shaping.

Back and Fronts:

Using No. 10 (3¼mm) needles and light colour, cast on 146 sts.
Work in k1/p1 rib for 3½ ins.
Next row (wrong side): Rib 9; (increase in next stitch, rib 15) 8 times; increase in next st, rib to end. [155 sts]

Change to No 7 (4½mm) needles and proceed as follows:

1st row: Knit
2nd row: Purl
3rd row: K39, m1, k1, m1, k75, m1, kl, m1, k39.
4th row: Purl
5th and 6th rows: As 1st and 2nd
7th row: K40, m1, k1, m1, k77, m1, k1, m1, k40.
8th row: Purl
9th and 10th rows: As 1st and 2nd
11th row: K41, m1, k1, m1, k79, m1, k1, m1, k41.
12th row: Purl
13th and 14th rows: As 1st and 2nd

Continue increasing in this manner on next and every following 4th row until there are 183 sts.
Continue on these sts. until work measures 11½ ins, from beginning, finishing at end of a knit row.

Next row: P7, (increase in next stitch p12) 13 times, increase in next stitch, purlto end. [197 sts]

Work rows 1 to 16 from Chart (odd rows knit, even rows purl), working bracketed repeat 7 times across row and odd stitch at end of
knit row and beginning of purl row as marked on Chart throughout.

Divide for Back and Fronts:

Next row (17th row of chart): Pattern 44 cast, off 10, pattern 88 (there now being 89 sts. on needle after cast-off); cast off 10, pattern to end.
[Editors note: So you have 3 groups of sts on the needle - 44 then 89 then 44]

Proceed on first group of 44 sts. for first front as follows:

Keeping pattern correct by working rows 18 to 30 inclusive of Chart, shape armhole by decreasing 1 st. at armhole edge on next and every alternate row until 39 sts. remain.
Work 4 rows, thus completing pattern from Chart.

Using darker colour for remainder of front, continue in stocking stitch until work measures 5 ins, from beginning of armhole shaping, finishing at front edge.

Shape neck: by casting off 4 sts. at beg. of next row.
Decrease 1 st. at neck edge on next and every alternate row until 30 sts. remain.
Continue on these sts. until work measures 7 ins, from beg. of armhole shaping, finishing at armhole edge.

Shape shoulder: by casting off 10 sts. at beg. of next and every alt, row until all sts. are cast off.

Rejoin wool to next group of 89 sts. and proceed for Back as follows:

Keeping pattern correct from Chart, shape armholes by decreasing 1 st at both ends of next and every alternate row until 81sts remain. Continue on these sts. until work matches first front up to shoulder shaping.
Shape shoulders by casting off 10 sts. at beg. of next 6 rows.
Cast off all remaining sts.

Rejoin wool to remaining group of 44 sts. and complete to match first front reversing all shapings.

Sleeves:

Using No. 10 needles and Light, cast on 50 sts.
Work in k1/p1 rib for 3 inches.
Next row: Rib 5; (increase in the next stitch, rib 9) 4 times; increase in the next stitch; rib to end. [55 sts]

Change to No. 7 needles and proceed in stocking stitch, increasing 1 st. at both ends of 5th and every following 9th row until there are 73 sts.
Continue on these sts until work measures 15½ ins, from beginning finishing at the end of a knit row.

Next row: P3; (increase in the next stitch, p5) 11times; increase in the next stitch; purl to end. [85 sts]

Work rows 1 to 16 inclusive from the chart, noting that bracketed repeat is worked 3 times across row, and odd st. at end of knit row and beginning of purl row as marked on chart throughout.

Keeping pattern correct from chart until 30th row of chart has been completed, and working remainder of sleeve in dark colour, shape top by casting off 4 sts at the beginning of the next 4 rows, 3 sts at the beginning of the next 4 rows, and then 2 sts at the beginning of the next 4 rows.
Decrease 1 st at both ends of every row until 43 sts remain, and then on every alternate row until 33 sts remain, and then on every following 3rd row until 29 sts remain.
Cast off 5 sts at the beginning of the next 4 rows.
Cast off.

Right Front Band:

Using No. 10 needles and light colour, cast on 11 stitches.

1st row: K2; (p1, kl) 4 times; kl.
2nd row: (kl, p1) 5 times; kl.
3rd and 4th rows: As 1st and 2nd.
5th row (make buttonhole): Rib 4, cast off 3, rib to end.
6th row: Rib 4, cast on 3, rib to end.

Continue in rib working a buttonhole as on 5th and 6th rows on every 23rd and 24th rows from previous buttonhole until 5 buttonholes in all have been completed.
Break off light colour and join in dark.
Still working buttonholes on every 23rd and 24th rows from previous buttonhole as before, continue in Dark until 7 buttonholes in all have been completed.
Work 16 more rows.
Slip stitches on to a stitch holder.

Left Front Band:

Omitting buttonholes, work to match Right Front Band.

Neckband:

Using a back-stitch seam join shoulders of Back and Fronts.
Slip stitches from top of Right Front Band on to No 10 needle, with right side of work facing, using dark colour, k2, (p1, kl) 4 times, p1 across these sts., using same needle, knit up 71 sts round neck, slip sts. from top of Left Front Band on to No 10 needle, (p1, k1) 5 times across these sts, kl. [93 sts]

Next row: * k1, p1, rep from * to last stitch, k1.
Next row: k2, * p1, kl, repeat, from * to last stitch kl.

Work 3 more rows in rib.
Make buttonhole on next 2 rows.
Work 3 rows in rib. Cast off.

To Make Up

Omitting k1/p1 rib, with wrong side of work facing, block each piece by pinning out round edges.
Omitting k1/p1 rib, press each piece very lightly using a warm iron and damp cloth.

"In order to preserve the lovely crepe appearance of Totem fabrics, these must be pressed very lightly as over-pressing will spoil the appearance of the finished fabric."

Using a flat seam for k1/p1 rib, and a back-stitch seam for remainder, join sleeve seams and stitch sleeves into position. Flat stitch front bands into position.
Attach buttons.
Press seams.

Materials

12 oz in light colour and 6 oz in dark colour in double knitting yarn.

[Editors note: 1oz = 28g.
See "a word on the wool".]

Two No 10 (3¼mm) and two No 7 (4½mm) needles.

Eight buttons.

Tension

21sts x 28 rows to 4 ins on No 7 needles, measured over stocking stitch.

Size matters

The instructions are for one size only.

To fit 34-36 inch bust. Length from shoulder to lower edge, 21¼ ins. Sleeve seam, 18 ins.

Abbreviations

m1: make one st by picking up loop between sts and knit into back of it.
m1p: make one st by picking up loop between sts and purl into back of it.
kb: knit into back of stitch
pb: purl into back of stitch
tog: together
tbl: through back loops
inc: increase by working into front and back of stitch
dec:decrease by working 2 sts. together

"Stranding" in Fair Isle

In working designs using two or more colours, you strand the colours by carrying those not in use loosely across the back of the fabric.
Do not strand colours over more than 5 sts. When a loose thread must pass over more than 5 sts. weave it over and under the colour in use at centre point of the sts. it passes over.

A word on the wool.

Original yarn was Patons Totem, or Moorland which are
double knitting, yarns. When substituting with modern yarns you often need to allow more than a straight equivalence of metric to imperial.

12oz is about 7 x 50g balls and 6oz is about 4 x 50g balls. A rough guide would say that 10 balls of yarn is enough to make a woman's sweater in a small size.

Disclaimer
(well...almost)

In transposing any pattern it is always a risk that errors will be introduced, in spite of dedicated proof reading.
If you have any problems with this pattern, please and I will try and assist.

© Christina Coutts 2007

Helpful Stuff

Recent Entries

Pattern Archive

Categories

Yarn Links

Fabric etc

Stuff to do


You've been counted...